Tag Archives: Lightroom

How to Make a Stippled Portrait in Photoshop?

Preparing the Photo

Open a high-quality portrait photo in Photoshop. Busy backgrounds don’t work well for stippling, so if the background isn’t a plain light color, before proceeding.

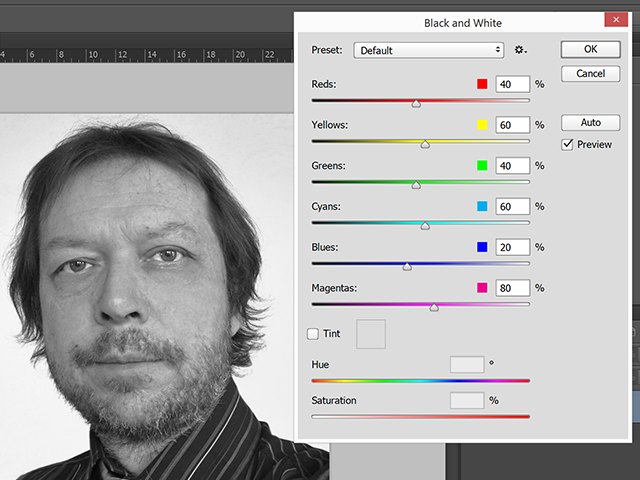
Change the photo to black and white by clicking the Image menu, selecting Adjustments and clicking Black & White. Adjust the sliders if needed to make the background as white as possible without disrupting the person’s face. For example, if the background was blue, drag the Blue slider slightly to the left to make it white. Click OK.

Photoshop's Black and White window

In most cases, the default Black and White options should work fine.

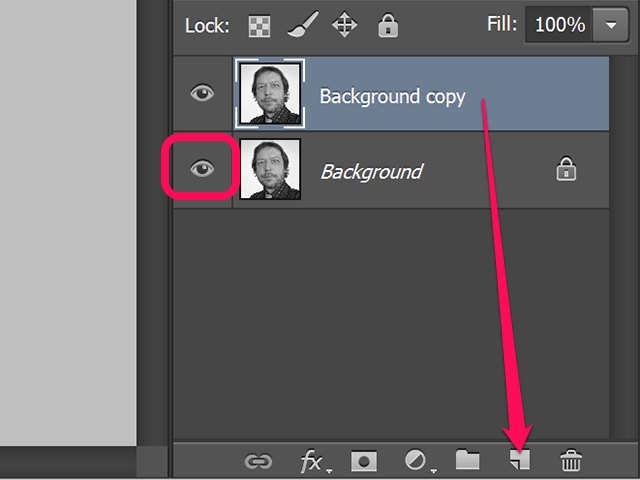
Duplicate the Background Layer in the Layers panel by dragging it onto the New Layer icon. Hide the Background Layer by clicking its Eye icon. You can use the hidden layer later in case you need to do the stippling a second time.

Layers panel

Create a copy of the Background layer

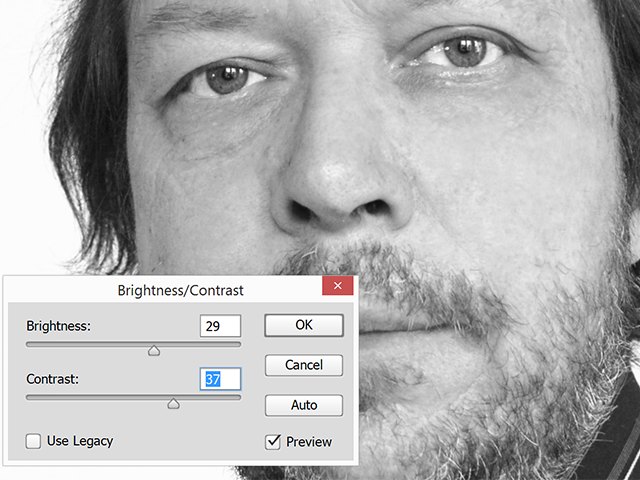
Click the Image menu, select Adjustments and increase the Brightness and Contrast to make the details crisp.

Brightness/Contrast window

In this example, the Brightness is set to 29 and the Contrast to 37.

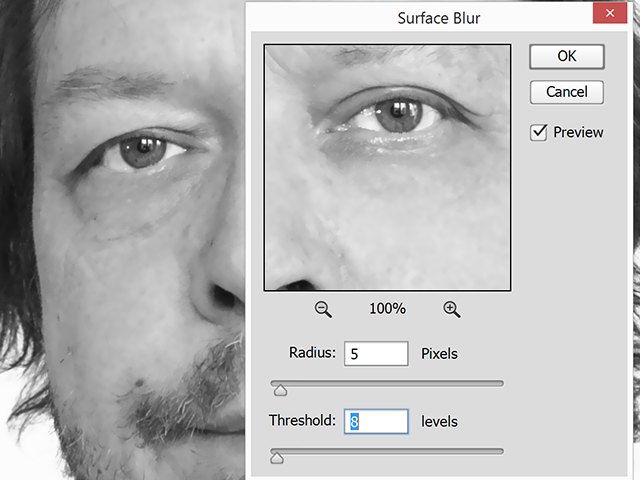
Select Blur from the Filter menu and click Surface Blur. Add just a bit of blur to smooth out the image.

Surface Blur window with Preview

Here, the Surface Blur Radius and Threshold filters are to 5 and 8, respectively.

Invert the photo by pressing Ctrl-I, or by clicking Adjustments under the Image menu and selecting Invert. The photo should now look like an old film negative.

Applying the Stipple

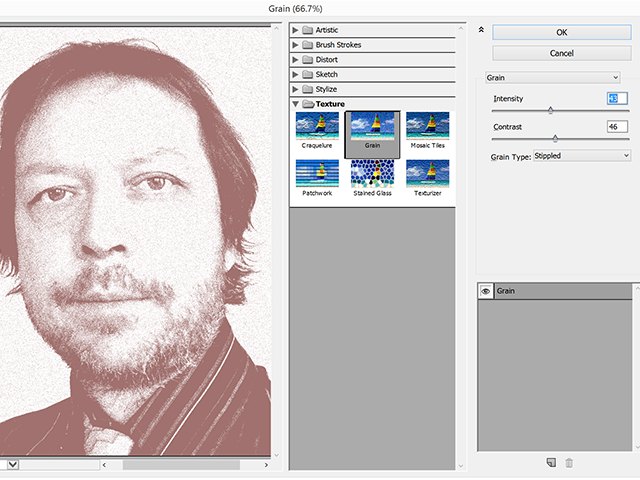
Open the Filter Gallery under the Filter menu. Click Texture and then click the Grainthumbnail. Change the Grain Type to Stippled.

Grain Filter options

Using a Contrast of 100 makes a portrait look like a Che Guevara poster.

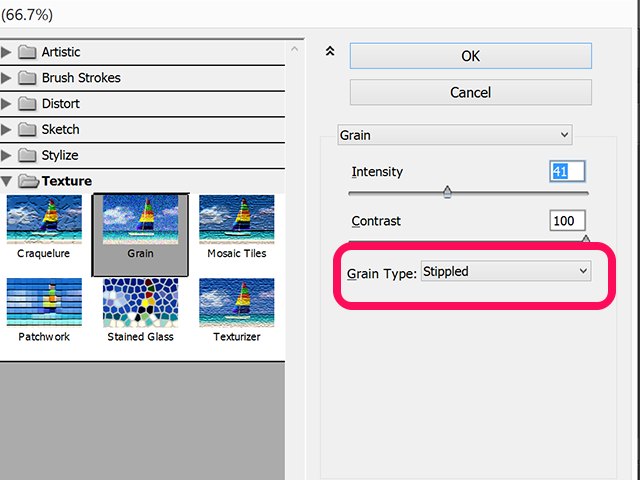
Begin by moving the Intensity and Contrast sliders to the middle and then adjust them as needed. Zoom in and out of the Preview image to be certain you get the effect you want. Click OK.

Grain Filter showing the preview

In this example, an Intensity of 43 and a Contrast of 46 works best.

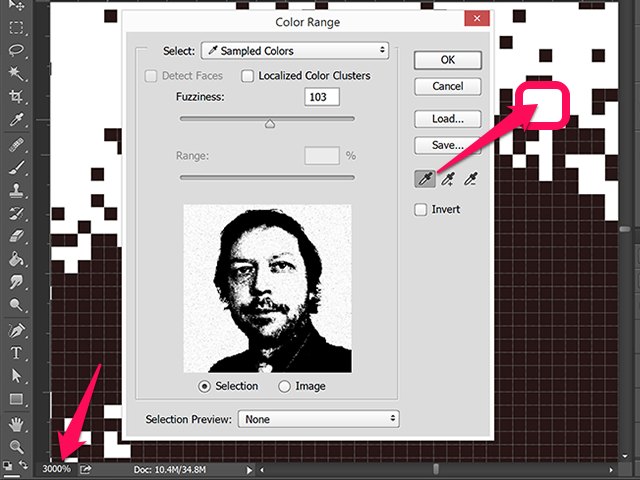
Zoom into the photo by 3000 percent so you can see the individual pixels and then open Color Range from the Select menu. Click on a light square and adjust the Fuzziness to about 100. Click OK. Press Delete to remove all of the light pixels and return the Zoom to normal.

Color Range window

The Fuzziness is set to 103 in this example.

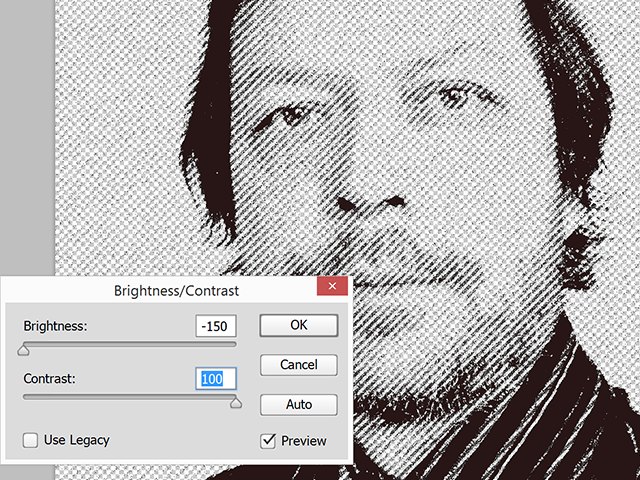
Select Invert from the Select menu to select all of the dark pixels. Open the Imagemenu’s Brightness/Contrast option. Decrease the Brightness slider to -150 and increase the Contrast to 100. Click OK.

Brightness/Contrast window

A dark, high-contrast removes gray pixels.

Zoom in and out to examine the grain that makes the stippled effect.

a stippled eye

Zooming into an eye to show the stippled portrait.

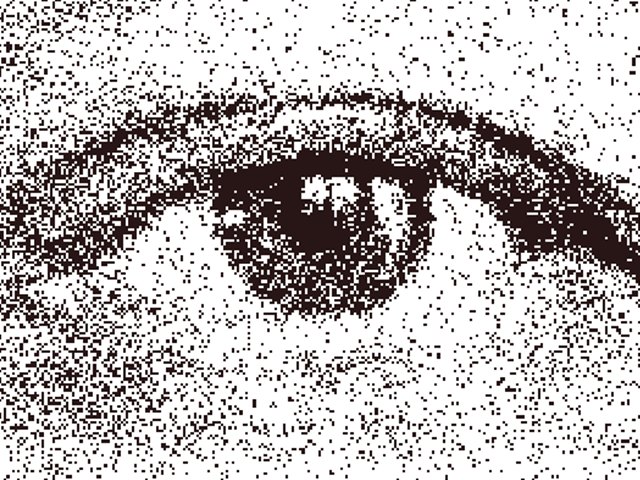
The portrait is now completely stippled. The first time you do this, you may not get the result you want. You can use the History panel — available under the Window menu — to go back and start again, or delete the current layer and use the hidden Background layer to begin again.

TRANSPARENT MATERIALS ON INVISIBLE MANNEQUINS

Trickier invisible mannequin items include sheer, transparent or translucent materials, fabric with cut out details, or a mixture of all these elements! There are a number of different approaches to photographing these styles, a selection of these are shown here.

How to make a dynamic business portrait?

Group portraits are always appreciated by companies. It’s the way to personalize your communication and get out sanitized visuals and formatted image banks.

Discuss with leaders or communication managers

Discover the company, its history, its activities and its objectives is the preliminary step to the shooting. This helps to understand the message that the company wants to go through the photo.

Shooting

I install my studio (lighting and background) within the company. Each person is taken individually. “Head-to-head” with the camera is not an easy exercise. I then try to create a friendly atmosphere, to build trust while discussing the work of the person, his hobbies, his passions. I like to observe how people speak, memorize gestures.

With or without accessories… Imitating movie posters…

Play with logo letters, share an event

Post-production

All the individual images are cut out, retouched and put together to form the team’s photo.

The advantages of this method of shooting

  • we avoid the cliché of the school photo
  • no one is hidden, everyone has the same importance
  • no unsightly shadow produced by the neighbor, everyone receives the same light
  • if a new collaborator joins the team, we can add it (and conversely)

Your opinion counts! Tell me if what you think of this kind of portraits. Thank you.

You can find some examples of my work on Our website

Easy Noise Reduction Tutorial in Photoshop

Have you always been scared of increasing the ISO on your camera in dim light because of the resulting noise in the images? Has this discouraged you from taking pictures in low light?

Fret not. This tutorial will take care of all your ISO noise anxieties and will let you go trigger happy during night shoots.

Noise reduction in Photoshop

  1. Open the image on which you need to reduce the noise.
  2. If you see the image panel, you’ll notice that the image will be opened as a background layer. Create a duplicate of the background layer (just in case).
    2
  3. Having selected the duplicate layer to go to Filter -> Noise -> Reduce Noise. A new window will open up with some sliders in it. Let’s break them down one by one.
    reduce noise window
  • Strength: This slider, affects globally. That means it will eliminate the noise pixels in the overall image.
  • Preserve details: Pixels tend to get blurred while reducing noise. The preserve details slider will bring back the texture and other small details in the image. Different combinations of strength and preserve details slider work differently for different images. You will have to experiment to see which combination gives the best quality.
  • Reduce Colour noise: This slider will reduce any floating colour pixels due to chromatic aberration.
  • Sharpen details: The blurring of noisy pixels may result in reducing the sharpness of the image. Use the sharpen details slider to restore sharpness in the image.
  1. At the end of all the sliders, you will see a checkbox that says “Remove JPEG artifacts”. This will remove any noise that may occur while saving the image as a JPEG.
  2. If you want to make noise reduction specific to the RGB colour channel, click on the advanced tab.
  3. Select the desired colour channel and make the adjustment to the strength and preserve details slider.
    channel wise noise reduction
  4. Once you are satisfied with all the changes, hit ok and the edited image will open in Photoshop.
  5. Unhide the layer on top to reveal the background layer. You will notice that noise has reduced from the original layer to the duplicate layer.
  6. Save your image and you are done with reducing the noise.
    noise reduction

Try more night shots

Now that you know the secret, try more night shots. ISO is a very good feature in digital camera if it only wasn’t for the resulting noise. Hopefully, camera manufacturers will try to come up with ways of minimizing the noise grains at high ISO but until then, this little Photoshop technique should do the trick.

Product Photography: Dave’s Coffee Syrup, great product, tough to shoot

This very simple product shot was in fact very, very, challenging due to the 360 degree reflective surface at the top of the bottle. I tried every trick in the book but could not stop the bottle from picking up some part of the studio, shoot enclosure or my equipment.Check out my work  at www.GeorgeRossPhotography.com.

I set the product on a translucent white still life table and shot two strobes through the table, from underneath,  to create the white background to remove the need for post-processing to keep the costs down. It creates some bleed around the edges but this was deemed acceptable without the expense of post-processing. I then use three softboxes with continuous lamps to light the product.

Recognizing that reflection was going to be problematic I attempted to use a shooting tent (typically, I avoid using shoot tents) but the bottle picked up too much detail from the tent. To solve this problem, I used white foam board, furring strips and duct tape to build a shoot enclosure which was broad and wide and only a few inches taller than the bottles and this did the trick proving a uniform reflective surface on the bottles with no external detail.

Often, what seems like a simple photo shoot can become very complex but where there is a will there is away.

Dave’s Coffee Syrup is an iconic Rhode Island product.

Dave’s Coffee, located in Charlestown, Rhode Island, is a Certified Organic Coffee Roaster and a member of Farm Fresh RI (which unites local Rhode Island food producers with consumers, restaurants and markets).

A full-service photo editing, Mostafa specializes in product photo editing, website photo editing, sports and portrait photo editing Located in Richmond, Rhode Island, wherever his clients need him. Call 01706619992


How to Make an Image Transparent

An image with a transparent background might be placed against a website background. This gives a Web designer flexibility in placing the image on the page, and it can help make the file size smaller versus creating a large background file with the image included. Not all image file formats support transparency, so the two file types to use are GIF or PNG. Most image-editing software that supports layers can create an image with a transparent section.

Photographers computer with photo edit programs.

Step 1

Create an image with a transparent background. Look for the setting in the New File dialog box that specifies the background color. Choose “transparent background” from the list, or check the box next to that option.

Step 2

Open the image you want to add to the transparent image. This is probably an image with a background you want to get rid of or an image that has a section you want to make transparent.

Step 3

Copy the image by selecting “Copy” from the “Edit” menu. Go back to the image created in the first step and select “Paste as New Layer” from the “Edit” menu.

Step 4

Use the “Magic Wand” or “Lasso” tool–it may also be called the “Selection” tool–to select the area you want to be transparent. Select “Delete” or “Clear” from the “Edit” menu to erase the area selected, making sure the layer you created in the previous step is the active layer.

Step 5

Erase any stray bits you may have missed using the “Eraser” tool, making sure the image layer is still selected.

Step 6

Check to make sure you can see the “background” through the part you erased. Most image-editing programs display a gray and white checkerboard to signify a transparent background, so you should be able to see this through the part of the image you erased.

Step 7

Save the file as a GIF or PNG file. Make sure to specify the option to keep areas of transparency.

How to Watermarking Images With Photoshop and Lightroom

Have you seen the writing on images? You know, the little pictures or words that show the photographer’s name? Those are called watermarks. Photographers often watermark their images so that they are properly credited for their work. Here are a few ways to watermark images with Photoshop and Lightroom.

Watermarks using Photoshop

You can create watermarks in Photoshop several different ways. Here are a few of them.

1. Text layer

The first way is to create a text layer. This is great for simple word watermarks. You can then write your name or your photography business’ name. From there, you can adjust the opacity as you see fit. Try adjusting the blending mode to achieve the look you want. To get the © symbol type; option+g on a Mac, or Alt+0169 on a PC.

MonicaDayDPS-Watermark-01

MonicaDayDPS-Watermark-03

MonicaDayDPS-Watermark-04

2. Logo file

If you have a logo you can place it on your image. You want to make sure your logo has a transparent background. Usually, this will be a PNG file, a GIF or even a vector graphic. If you are unsure, check with your logo designer. Use the place option to put your logo on your image. Again, you can adjust your opacity and blending modes to get the desired effect.

MonicaDayDPS-Watermark-05

MonicaDayDPS-Watermark-06

MonicaDayDPS-Watermark-07

MonicaDayDPS-Watermark-08

2a. Making your logo background transparent if it isn’t already

If you have a logo file that does not have a transparent background then follow these simple steps to create one. First, open your file in Photoshop. Go ahead and unlock this layer (double-click it, then hit Enter).

Watermark-01

Watermark-02

Watermark-03

Next, use the magic wand to select the background. If the background is not a solid color then select your logo image and then invert the selection. Now that your background is selected, simply cut. You can do this with cmd+x (Mac) or ctrl+x on a Windows computer.

Watermark-04

Your image should now have a transparent background. Save this file as a.PNG (JPGs cannot hold transparency) and you’re ready to go.

Watermark-05b

3. Using the brush tool

For an even easier way to watermark, create a brush. This way you do not have to go through these steps each time you want to watermark your images.

To create the brush with the text you’ve written you will need to open a new document in Photoshop. Make sure your document has a transparent background. Type the information you want to have your watermark. Make sure you have it set up exactly like you want it on your images. Once you have your watermark just as you want it you should go to Image > Trim > Transparent Pixels. Next, Edit-Define Brush Preset. Name your brush and you’re ready to go. The same process can be done with your logo file.

MonicaDayDPS-Watermark-09

MonicaDayDPS-Watermark-10

MonicaDayDPS-Watermark-11

MonicaDayDPS-Watermark-12

MonicaDayDPS-Watermark-13

MonicaDayDPS-Watermark-15

MonicaDayDPS-Watermark-16

MonicaDayDPS-Watermark-17

You can now use your brush as you would any other brush. The key to having it watermark is to create a layer and select the brush that is your watermark. A simple click will watermark your image. You can adjust the size, opacity, and be blending mode as you like.

For more on making a signature brush read: How to make a signature brush in Photoshop

Watermarks using Lightroom

Lightroom has an awesome feature built-in that allows you to watermark your images upon export. In order to use this feature, you must first set up your watermark, to do that go to Lightroom>Edit Watermarks.

Screen Shot 2014-09-16 at 5.49.22 PM

You can choose an image or text. There are several different settings that allow you to adjust your watermark like you want. Remember, to get the best results you’ll want to use a PNG file with a transparent background. If you don’t, you’ll have a white box around your logo. You’ll need to save and name your watermark.

For a text watermark simply write your desired information in the white box. You can change the font, color, shadow, and size of your watermark. Watch the image to see your desired effect. Use the Anchor option to adjust placement and the Inset option for further tweaks.

Screen-Shot-2014-09-16-at-5.02.11-PM2

Make sure you use a logo file with a transparent background to avoid this white box. JPEG files do not have transparent backgrounds.

Now that your watermark is all set up, let’s apply it to your image. Go to Export and Watermarking. There you can choose whatever watermark you have set up. Your image will be exported to the desired location with the watermark chosen.

Screen-Shot-2014-09-16-at-5.06.01-PM2

This image was watermarked in Lightroom with a shadow.

Have you got any other methods for adding a watermark to your images? Please share your tips or your results using these methods in the comments below.

Photoshop How-To: New Tri-Range Frequency Separation Action

Whether you believe that the approach is obsolete, amazing, or simply useful, the frequency divide still persists in the photography industry and has been for many years. Here’s how I used a new method that increases control over all three main categories: High, Mids, and Chimes.
Trying to break the frequency and the true methods have been used for years, it is lightweight, controversial. If you have spent any real time through the frequency separation in your finishing, then you have probably determined what you like and do not like about the method, and you probably want to remove those limits Has developed simple tasks around the techniques that you constantly encounter. To me, the opposite was a common issue, so I discussed it so that I can make it easier for me on the contrary (especially when working in a hurry under the time limit stress). So when it is arrogant to think that I have created a super useful and fresh way to separate the frequency, I will let you become a judge

Wait, What’s Frequency Separation Again?
But before that, we normally refresh ourselves when the frequency Separation. Speaking roughly, there are two different ways to differentiate the frequency:

Modify the high and low-frequency layers directly, clean the scars on the high and smoothen the color transition on the following
To paint the skin color to smooth the infection, use empty layers between high and low-frequency layers (this method assumes that you have completed your dexterity with treatment and burnt before the frequency separates is.
I use the latter method almost exclusively, I think it gives me more control in general, and since I dodge and burn my theory as a technique to prove the skin, then the frequency is different. Is the last polish that can be used only when needed

If you have read this point, but so far the frequency is not the remote idea of separation, then for many explanations and approaches about it sneak a peek at Fstoppers.

I’m a control bizarre, so what’s next?
But what about more control? A few weeks before the amortization a couple of weeks ago, I was thinking that I can control my frequency differently “painting” more accurately and quickly. After some experimentation, I decided that a decent aspect to control would be three big categories: low, mid and high. After a few minutes, I prepared a three-row masking action for Photoshop (free download link), allowing you to control the total mask control of the painting work, which separates your frequency divided into three main categories in the photo frequency. is. For a six-minute explanation, check out the video above to see how I use it occasionally. Please keep in mind, this action is hardly a master solution of all things, so use it to see if you can get results together and ultimately decide what is best to use in your workflow (if absolutely).

This action is the perfect complement to Photoshop for my Freakscape control plug-in, but you can be reprogrammed to work with any frequency separation setup already used.

Download the Action here.

RAW vs JPEG/JPG Files

Screen-Shot-2015-12-01-at-12.19.51
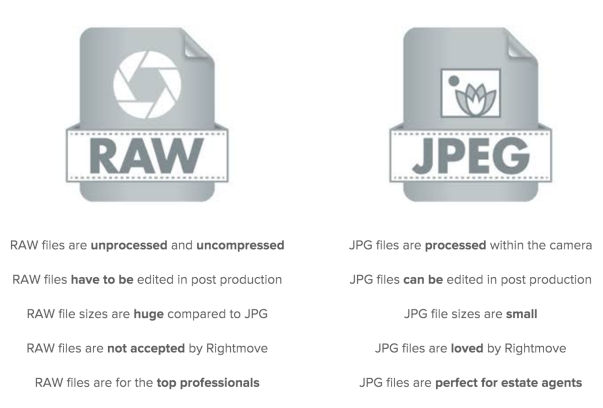
This is the subject of discussion since the beginning of digital photography. Am I shooting in Raw? What is raw Raw actually does not stand for anything, as its name suggests, it refers to the raw data emerging from the camera. The important difference is that raw files are uncompressed and untouched, while JPEG file formats are compressed and edited within the camera itself. Raw files capture data using the whole camera sensor and then the image output because it is also moving forward to larger file sizes. JPEG files usually output at lower quality because the camera processes the information, adds color and then compresses it to everyone in the final image

Raw files are very worthless unless you plan to edit them later. They are meant to be as elaborate and flat as possible, so all you can change as you like. With JPEG files, you can use them as soon as they are exported from the camera because they have already been edited, if you have a RAW file then the color and exposure level can be very difficult. .

Editing JPEG files is considered as destructive editing, due to the fact that you are overlaying the previous information that has been overwritten with new information. With RAW files, the original data is not actually being edited. You are going through the process of exporting raw data manually to JPEG, that the camera will usually use automatically, having raw files will give you much more potential and flexibility in editing that you have with the JPEG file Will happen.

It is not right or wrong to come in the file format to use it. It depends on how much you want to work in images and how happy you are. File size, I told it briefly earlier and this is one of the reasons that some may choose to use one on each other since there is no compression with raw files, so size is much higher than JPEG files. However, if you are serious about photography, you should choose quality and detail every time you save space. Think about it, with RAW files, you can convert them to JPEG at any time but you can not do it in another way.

Why Product Photography is Important for your Business

Building an e-commerce store has really become a viable way of starting a business. With the development of technology, anyone can buy anything with the push of a button on their smartphones such as Amazon or eBay. This is not necessary for a customer to go to the shop to buy a product physically. However, due to the small startup cost, compared to a physical store on High Street, the market is very competitive.product photo

When a new customer searches for your product, maybe you went through hundreds of other online stores before, they will decide very quickly based on their first impression. Although website design and branding need to be attractive, at the end of the day, they only work as support for your product. The main point of focus will be how you display your products through photography.

Taking images on a smartphone to shoot professional photos can cost a lot, but you will surely see the difference in your sales. Renting a professional photographer will save you time and money that you have spent buying and learning about the technical aspects of the DSLR camera, lighting and then software for photo editing.

Lighting and finishing are the key aspects of taking good product photos for your business. Photographer’s work is not finished after a click of a button Product Photos which are bad lights or pixelated, they can be seen very soon and this will harm your brand’s credibility and quality of the products. Hence having images that are bright, clean and crisp will allow customers to see the product effectively. This fact needs to be changed so that they can not physically see the product in the shop.

If you are thinking of starting an online business or already about an existing one and you think you need to update your images, contact your local product photographer and see that you are with each other How can I work.